
Your photos live in five places: a laptop folder called to sort, two old memory cards, a shared Dropbox nobody owns, and your phone. Somewhere in there is the shot a client asked for this morning, and you have no way to look it up.
What a photo catalog actually is
A photo catalog is a searchable record about your photos: where each file lives, when it was shot, and what it shows. The files are the collection. The catalog is the card index that finds things in it.
That distinction matters because folders alone are not a catalog. A folder gives each photo exactly one address, but you look for photos in several ways at once: by client, by date, by what is in the frame. A catalog records all of those, the same way a library card index filed one book under author, title, and subject.
Photographers often hear "catalog" and think of a Lightroom catalog, the database Lightroom Classic keeps about your keywords, ratings, and edits. That is a true catalog with one hard limit: it lives on one machine and opens for one person at a time. The method below is tool-agnostic, and Lightroom is one honest way to do the final step.
How to catalog photos in five steps
The order matters. Each step makes the next one cheaper, and skipping ahead to tagging a scattered, duplicate-riddled library wastes most of the effort.
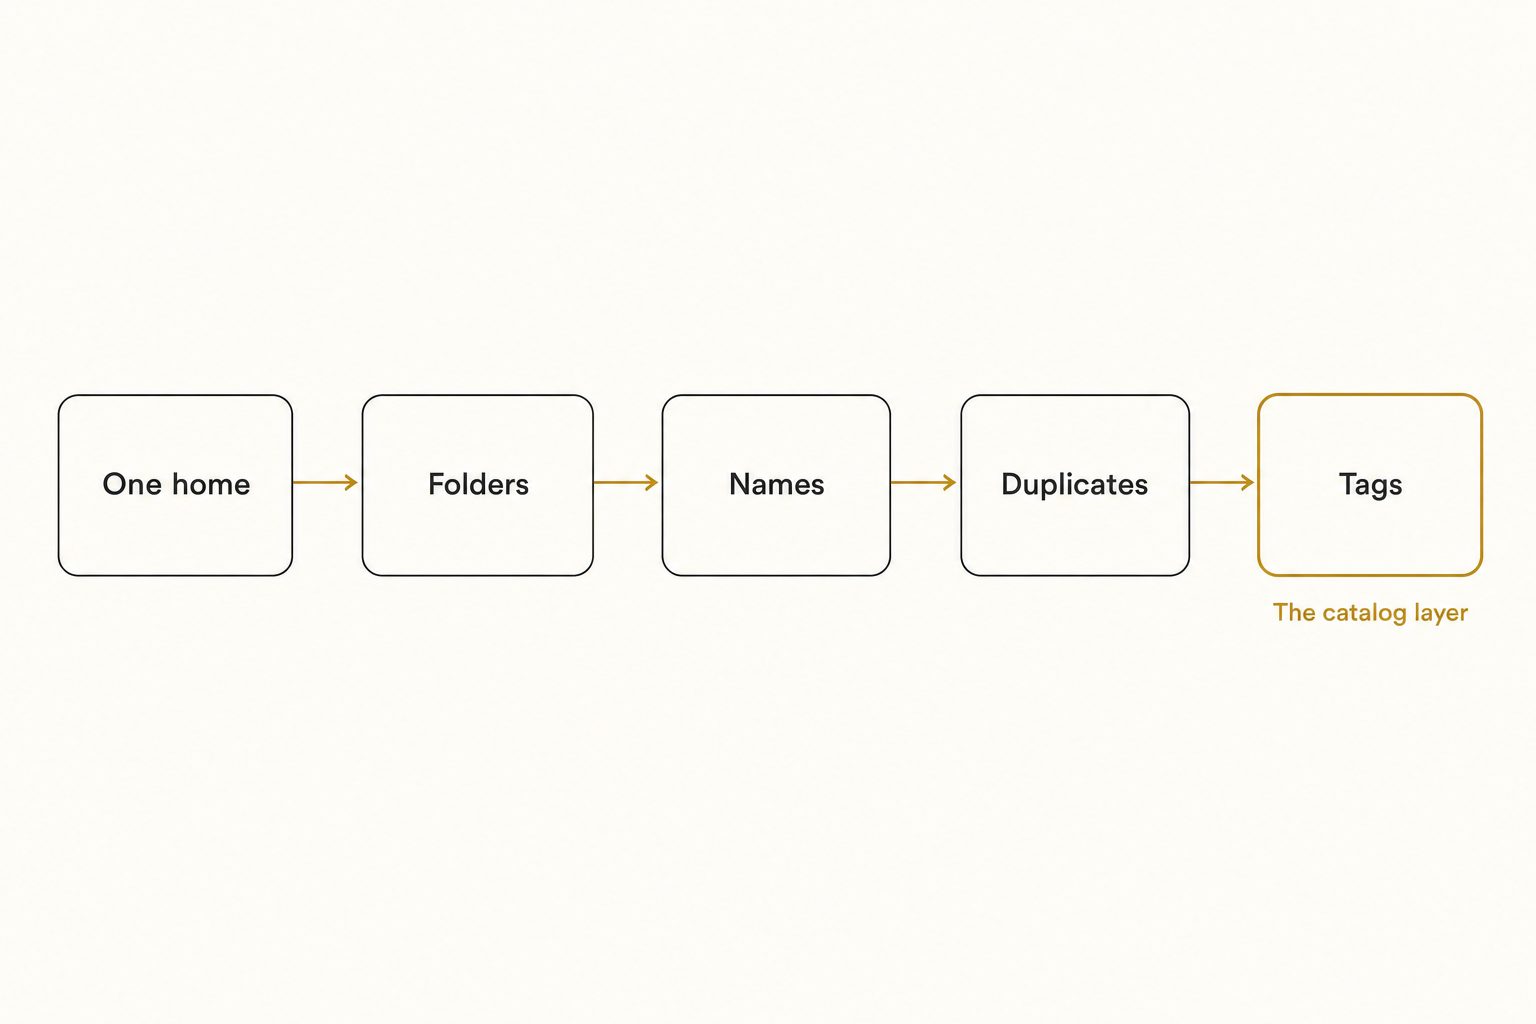
Step 1: Give every photo one home
Start with a boring inventory. The Library of Congress opens its personal digital archiving guidance the same way: list every place photos live (cameras, computers, memory cards, cloud accounts) before organizing anything. Then pick one home and move everything into it.
For a team, that home should be storage the business owns. A shared drive or a team Dropbox survives turnover; a folder in someone's personal account leaves when they do.
Step 2: Build a shallow folder skeleton
Three levels is enough: year, then project or shoot, then a selects folder for the approved frames. Shallow trees are fast to file into and fast to click through, and topic-based trees fail because one photo can belong to two topics.
The platform details differ, so use the guide that matches your storage: organizing photos in Google Drive or organizing Dropbox photos.
Step 3: Name files at intake
A file called IMG_4827.JPG is invisible to every search box it will ever meet. Rename in batch as each shoot lands: date first, a short project code, a few words for the selects, a padded sequence number, like 2026-06-12_lakeside_first-dance_014.jpg.
The full system, including character rules and version suffixes, is in our guide to photo file naming conventions. Ten minutes at intake beats fifty hours of retroactive typing.
Step 4: Sweep out the duplicates
Consolidating scattered folders always surfaces duplicates: exports next to originals, three copies of the same delivery. They poison a catalog, because every search returns the same shot three times and nobody knows which copy is canonical.
Run a duplicate pass once, before tagging, using the method in deduplicating a messy photo library. Tag effort spent on a duplicate is effort thrown away.
Step 5: Record what each photo shows
This is the step that turns tidy storage into a catalog. A filename holds the two or three words you typed at intake; tags hold the other twenty things visible in the frame, like "champagne toast", "string lights", or "roast chicken flatlay". Tags are what let you search the way you remember.
Done by hand, this means keywords in Lightroom or Adobe Bridge plus star ratings for the keepers. Done well, it is the single most valuable layer in the whole system, and also the most expensive one.
Where manual photo cataloging hits the wall
The math on step five is blunt. A skilled keyworder produces 100 to 200 tagged photos per hour, which works out to 5 to 8 hours per 1,000 photos. A 10,000-photo library is a month of evenings, and that is why most manual cataloging projects stall somewhere in year two of the folder tree.
The break point arrives at the 1,000-photo wall, the point somewhere between 1,000 and 5,000 photos where a library outgrows anyone's memory. Below it, folders and filenames genuinely work. Above it, the questions change shape: you stop looking for "the June 12 shoot" and start looking for "the roast chicken flatlay from the spring menu shoot", and no folder tree answers that.
The modern fix is to let a vision model do step five. A connected AI catalog reads your Google Drive or Dropbox with read-only access, looks at every photo once, and writes tags plus a sentence of description into a searchable index, with your files and folders untouched. That first pass ran unattended in the background; after it, any frame comes back from a description search in seconds.

This is a category, not one product. Several tools index cloud photos in place, and Tagrly is one of them; the full field, including desktop and enterprise options, is in our image catalog software buyer's guide.
Tip. You can test the tagging layer before committing to it. Tagrly's free tier catalogs the first 500 photos in any Drive or Dropbox folder, no credit card, so you can run it on one real folder and judge the tags against your own shots.
Keep the catalog alive
Catalogs do not fail on day one. They rot, one uncataloged shoot at a time, until the team quietly stops trusting search and goes back to scrolling folders.
Three habits prevent that:
- One door. Every new shoot enters through the same door: land in the home, file into the skeleton, batch-rename, tag.
- One owner. One named person owns intake, because "everyone does it" means nobody does.
- One page. The rules live on a single written page, so the system survives the person who invented it.
Warning. A half-cataloged library is worse than an uncataloged one, because searches that miss the newest work teach people the catalog lies. If you automate one thing, automate step five, since it is the step humans skip first on a busy week.
Which approach fits your library
There is no single right way to catalog photos, only the right one for your size and team.
- Pick folders, names, and nothing else if you are under about 1,000 photos and working alone. The free layer is genuinely enough, and the pillar guide to finding any photo in your library covers how far it stretches.
- Pick Lightroom or a desktop keyworder (Excire, Mylio) if you are a solo photographer who lives in an editing app. Keywording during culling is the cheapest manual tagging there is.
- Pick a connected AI catalog if the library lives in Drive or Dropbox, a team needs to search it, and it is already past the wall. Tagrly is one option in this tier.
- Pick an enterprise platform if you need brand governance, approval workflows, and have a procurement department. That is a different problem than cataloging.
Cataloging photos is five steps, and four of them are free: one home, a shallow skeleton, names at intake, a duplicate sweep, then tags that record what each photo shows. Do the free four this weekend and you will feel the difference on Monday. When step five is the one standing between you and a searchable archive, point a catalog at one folder and let it read the photos for you.
Frequently asked questions
What is the best way to catalog photos?
Work through five steps in order: give every photo one home, build a shallow year-and-project folder tree, rename files at intake with a date-first convention, remove duplicates, then add searchable tags that record what each photo shows. The first four steps cost nothing but time and carry a library to about 1,000 photos. The fifth step is the one that makes a real catalog, because tags are the only layer that records the contents of the frame. Below a thousand photos, tag your best shots by hand. Past that, an AI pass that reads every image is faster than any manual project.
What is the difference between cataloging photos and organizing them into folders?
A folder gives each photo exactly one address. A catalog records many ways to find the same photo: the client, the date, the place it sits in storage, and what the image actually shows. Folders are still worth building, because they keep storage tidy and make delivery easy, but they force you to predict at filing time every way you might search later. A catalog does not care where the file sits. It matches the way you actually remember photos, by what was in them, which is why the catalog layer rather than the folder tree is what makes a large library searchable.
Should I use Lightroom to catalog my photos?
If you are a solo photographer who already edits in Lightroom Classic, yes. Its catalog handles keywords, ratings, and collections well, and adding keywords during culling costs little extra time. The limit is that a Lightroom catalog is a single-machine database: it opens for one person at a time and Adobe advises against putting it on a network drive, so it cannot serve as a team's shared index. If several people need to search the same library, or the photos live in Google Drive or Dropbox rather than on one person's editing machine, use a shared catalog that reads photos where they already are.
How long does it take to catalog thousands of photos?
Manual keywording at editorial depth runs 5 to 8 hours per 1,000 photos, so a 10,000-photo library is a month of evenings. That math is why most manual cataloging projects stall halfway. An AI tagging pass on the same job runs unattended in the background on a connected catalog. The folder, naming, and duplicate steps are quick by comparison, usually a weekend even for a messy library.
Do I need special software to catalog photos?
Not to start. The first four steps, one home, shallow folders, real filenames, and a duplicate sweep, need nothing beyond the storage you already use. Software enters at the tagging step, because tags need a database to live in. Solo editors get that from Lightroom or a desktop keyworder like Excire. Teams with photos in Google Drive or Dropbox get it from a connected catalog that indexes photos in place; Tagrly is one option, and its free tier catalogs the first 500 photos in any folder so you can judge the output before paying anything.
Try Tagrly on your own photo library
Connect your Google Drive or Dropbox folder and Tagrly will tag every photo in bulk. Search by what is actually in the image, share specific shots with clients, and never lose a photo again.
- Free for your first 500 photos
- Read-only access, revoke anytime
- No credit card