
You have 14,000 photos in a Drive folder, the filenames are all DSC_0481.jpg, and someone needs the four rooftop sunset shots from the launch event by Thursday. You know the photos exist. You just cannot find them, because there is no search box in the world that can match "rooftop sunset" against a file called DSC_0481.jpg.
This is the hub guide for the whole problem. It covers why large libraries become unsearchable, the four ways people try to fix it, the search method that actually scales, and how the same approach handles sharing, cleanup, and the specific quirks of different teams. Each section links to a deeper guide if you want the step-by-step.
Why a large photo library stops being searchable
There is a wall, and it sits somewhere between 1,000 and 5,000 photos. Below it, you can usually remember roughly where a shot lives. Above it, the library goes opaque, and "find the magnolia tree photo" turns into a 45-minute scroll through thumbnails. We named this the 1,000-photo wall in our complete guide to AI photo tagging, and it is the root of every problem on this page.
The wall exists because of how photos are named. A camera writes filenames like IMG_4827.JPG or DSC_0481.jpg. That string tells you nothing about the bride, the sunset, the plated dish, or the rooftop. So when you search, there is nothing to match against. The photo is in there, fully visible to a human eye, and completely invisible to the search box.
Folders feel like the answer, and they help a little. But folders force a decision at upload time: every photo goes in exactly one place, chosen by one person, on one day. The moment a second person would have filed that shot under "Q3 campaign" instead of "rooftop launch," the system quietly breaks. Multiply that across two years and five people and the folder tree becomes another thing you have to search through.
Note. A 2012 McKinsey Global Institute report put the time knowledge workers spend searching for and gathering information at roughly 1.8 hours a day. The number is old, but the pattern has only grown with the size of shared drives. Photos are the worst case of that problem, because unlike a document, a photo has no words inside it for search to grab onto.
The takeaway: a large library is not unsearchable because it is messy. It is unsearchable because the thing you want to search by, what the photo shows, was never written down anywhere a computer can read.
The four ways people try to find photos (and where each breaks)
Before reaching for a tool, it helps to see the full menu, including the free options. There are four common approaches, in rough order of cost.

1. Browse and scroll (free, does not scale)
The default. You open the folder and scroll until you spot it. This works fine up to a few hundred photos and becomes hopeless past a few thousand. It is free, it requires no setup, and it is the reason people lose entire afternoons. If your library is small and personal, browsing is genuinely the right call. Do not overbuild for a problem you do not have.
2. Manual folders and naming conventions (free, high discipline)
You impose a folder tree and a naming rule: 2026-06-rooftop-launch-001.jpg. This is real organization, and a disciplined solo worker can make it sing.
The catch is that it only works if every photo is named and filed correctly forever, by everyone, with no exceptions. On a team, that discipline does not survive contact with a busy week. It also forces you to predict, at upload time, every way you might later want to find the photo, which no one can do.
3. Cloud search built into Drive and Dropbox (free, mostly blind to photos)
Both Google Drive and Dropbox have a search box. The trap is that it was built for documents. Drive's search operators match filenames, file types, owners, dates, and the text inside documents and PDFs through OCR. It does not look inside a JPEG.
So a search for "sunset" returns only photos with the word sunset already in the filename or a hand-typed description, which in a real camera-named library is almost none of them. We dug into exactly why this fails in why Google Drive's photo search misses 90% of your photos.
4. A content-reading search layer (paid, scales to 100,000+)
The fourth option is a tool that reads every photo once, records what each one shows, and makes the whole library searchable by content. This is the only approach that scales to a six-figure library without a full-time librarian. It costs money, because reading 100,000 photos with a vision model is real compute. The rest of this guide is about how this approach works and when it is worth paying for.
Tip. Pick the cheapest option that actually solves your problem. If you have 600 personal photos, browse. If you have 14,000 shared work photos and a team that needs them, options 1 through 3 will keep failing you, and a content-reading layer pays for itself the first time someone types a description instead of scrolling for an hour.
How to find any photo by what's in it
The method that scales has three moves, and naming them makes the rest of this guide click into place.
One. Connect to where the photos already live. The good tools read directly from Google Drive or Dropbox with read-only access. Nothing is moved, copied, or migrated. Your folder structure stays exactly as it is. Be skeptical of any tool that makes you upload your whole library into its own storage first.
Two. Read every photo once. A vision model looks at each image and writes down what it sees: the focal subject, the surrounding context, the setting, the lighting. This is a one-time indexing pass. It is the slow, expensive step, and it only happens once per photo.
Three. Search by description. With every photo's content written into a small text index, you type a plain-English query, "rooftop sunset with a crowd," and the matching shots come back instantly. You are searching a lightweight text index now, not re-scanning image files, which is why the result is fast even across 100,000 photos.
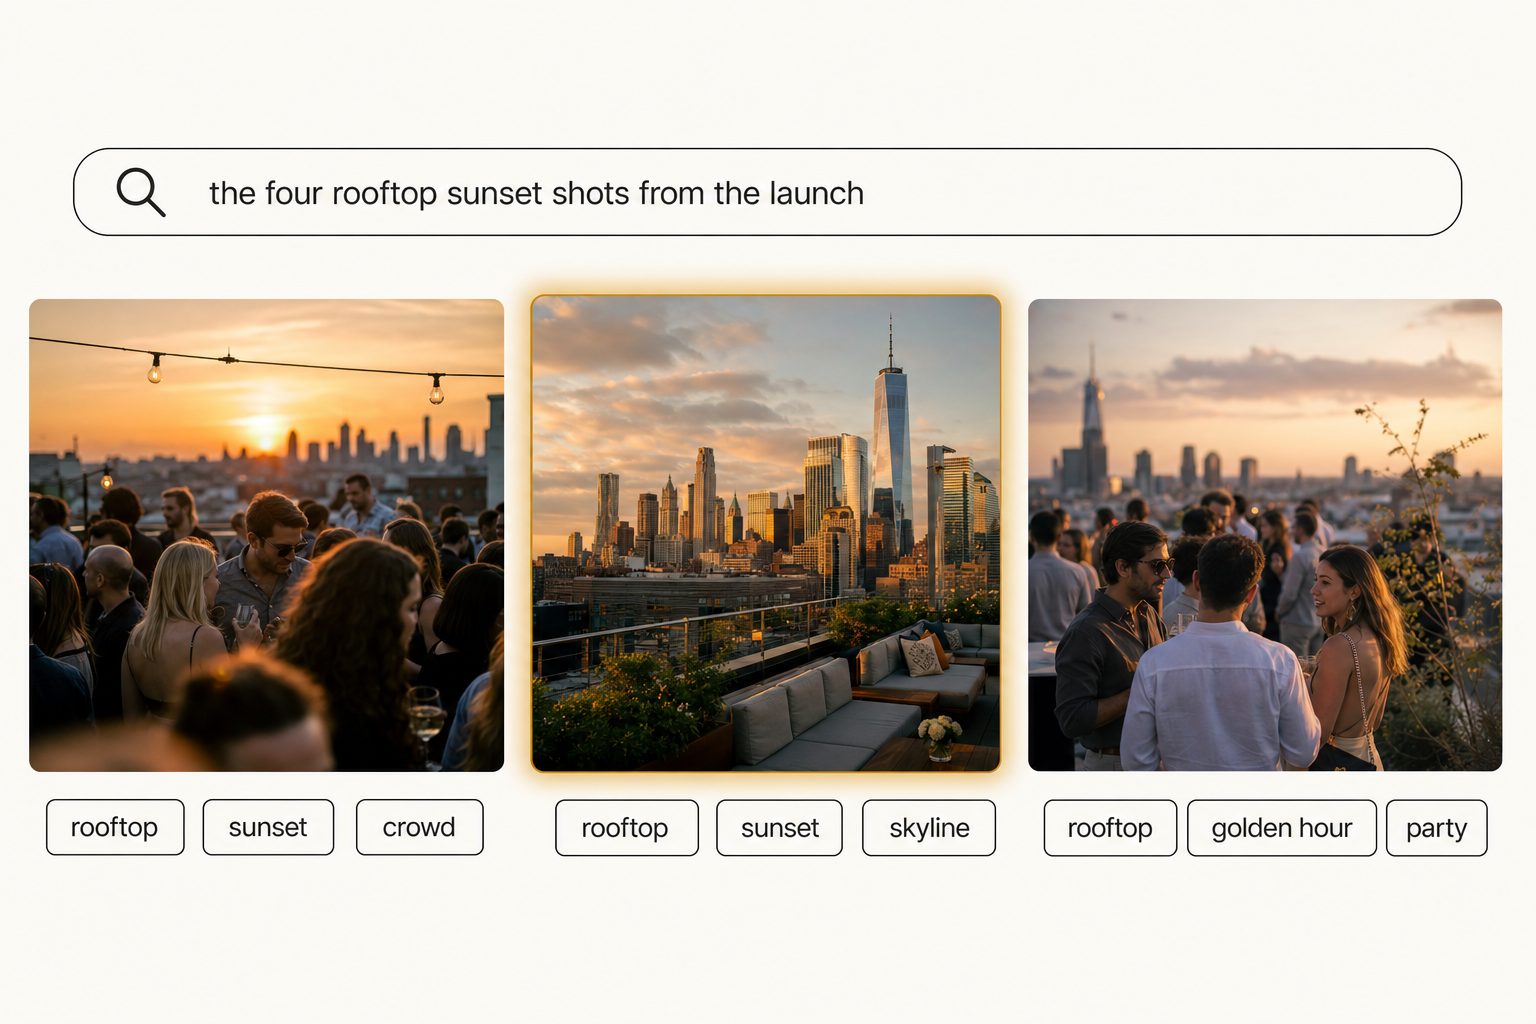
The quality of step two decides everything. A weak tagger writes "person, building, sky" and your search for "rooftop sunset" returns nothing useful. A strong one identifies the focal subject first, then ranks it above the background clutter.
We call that discipline focal-subject tagging, and it is the difference between a search that returns the one right photo and a search that returns 200 photos that merely contain a building. The full method lives in the 3-tier focal-subject tagging method.
Searching by description in practice
The everyday version of this is typing what you remember about a photo instead of what it was named. "The candid shot of the bride laughing during the toast." "The overhead plate of the roast chicken." "The empty rooftop before guests arrived." Each of those is a description of content, and content is exactly what a properly indexed library can match. We walk through the hands-on version in how to search photos by description in Google Drive, and the case where you only half-remember the shot in how to find a photo when you can't remember its name. If you want to know what the machine is actually matching, searching photos by what is in them explains how content search works under the hood.
Tip. Want to see this on your own photos before reading further? Tagrly's free tier tags the first 500 photos in any Drive or Dropbox folder, no credit card. Sign in and connect a sample folder, then type a description of a shot you know is in there.
What "good" search looks like at 100,000 photos
Good search at scale comes down to two things: the right photo lands at the top, and search stays fast no matter how big the library gets. Here is what each one looks like in practice.
On quality, focal-subject tagging is what moves the needle. In Tagrly's own testing on a 5,000-photo set, it returned the right photo as the top AI photo search result in roughly 9 of 10 queries. Keywording those same 5,000 photos by hand at 150 photos per hour would take more than 33 hours of someone's time before the first search.
On speed, the search feels instant at any size, because a query reads a small text index of tags and descriptions, never the image files. The indexing pass runs unattended in the background, and what is already read is searchable while the rest is still going. We go deeper on why size barely matters in how fast AI image search is across 100,000 photos, and on the indexing side in how fast AI photo tagging is on a large library.
The cost works the same way: you pay to read each photo once, and searching does not re-read anything.
| What happens | How often | Grows with library size? |
|---|---|---|
| Reading a photo | Once per photo, at indexing | Yes, one credit per photo, never charged again |
| Keyword search | Every query | No, free and instant |
| AI-assisted search | Every query you choose to run that way | No, one credit per search regardless of library size |
The load-bearing idea: indexing is a one-time cost, and search is cheap forever after. Any tool that re-scans your library on every search is doing it wrong and will not survive a six-figure archive.
Finding photos across more than one place
Real libraries are rarely tidy. Half the photos are in Google Drive, the other half landed in Dropbox, and neither app can search the other. So you check both, twice, and still miss the shot.
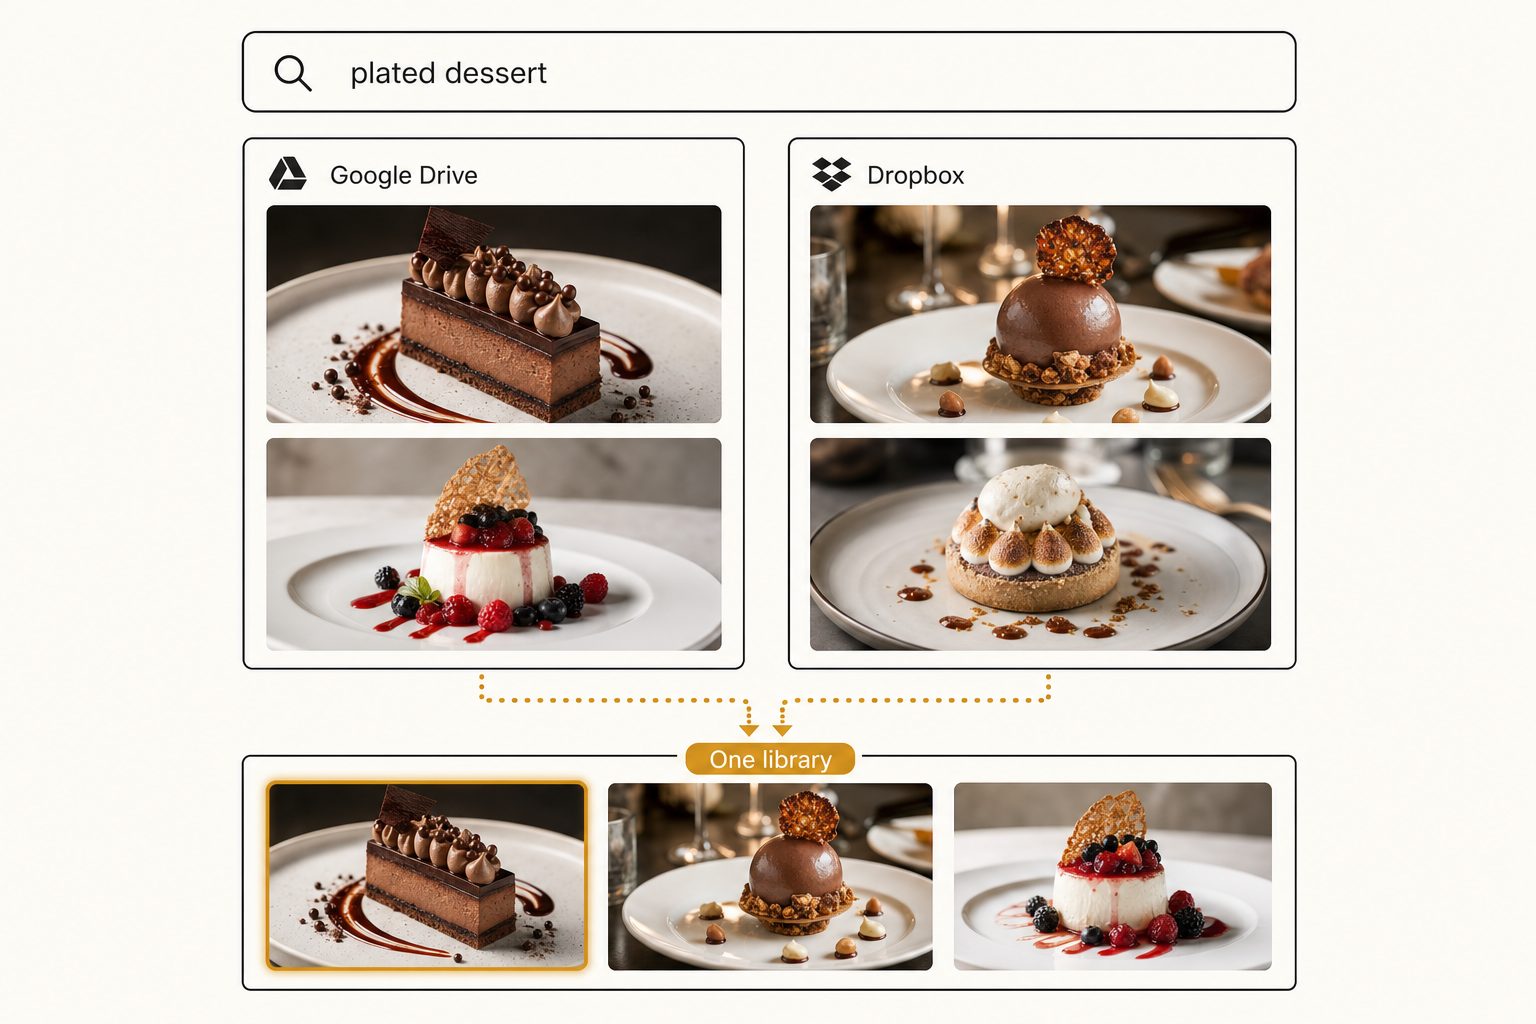
The fix is a catalog that connects to both clouds read-only and builds one searchable index spanning them. You search once and get matches from wherever the photo actually lives, without thinking about which app it is in. We cover the split-library case in detail in how to search across Google Drive and Dropbox at once. If everything lives in one cloud, start with organizing photos in Google Drive or what Dropbox photo search finds and misses.
There is a related problem inside a single Drive: telling your own shoots apart from licensed stock that someone dropped in. When provenance is part of what gets read and recorded, you can filter the whole library by it. That specific job is in how to tell stock photos from originals in Google Drive.
Sharing the photos you find (without handing over everything)
Finding the shot is half the job. The other half is getting four specific photos to a client or a colleague without exposing the raw take, the unapproved edits, or another client's work.
The free version is to copy the chosen files into a fresh folder and share that. It works for a one-off and gets tedious fast when you are pulling a handful of shots from a large mixed library every week. Dedicated proofing galleries (Pixieset, Pic-Time, ShootProof) are the right tool for the one-event delivery case, and we say so plainly. The at-scale version, pulling a few shots from a years-deep library and sending just those, is covered in how to share specific photos with clients.
For a team that shares one library rather than delivering to outside clients, the question is slightly different: how do you give everyone findability without giving everyone a mess to maintain? That setup is in setting up a shared photo library for a small team. A shared folder is shared storage. A shared catalog is shared findability, and those are not the same thing.
Note. A read-only connection matters here. The better catalog tools request
drive.readonlyscope, so the tool can see and tag your photos but can never move, edit, or delete them. Sharing a curated set never touches your originals.
Keeping the library clean as it grows
A library that doubles every year accumulates two kinds of cruft: duplicates and dead weight. Duplicates are the worse problem, because they bloat the library and split your search results across near-identical files.
The reliable way to find duplicates is perceptual hashing, which fingerprints what a photo looks like rather than its exact bytes, so it catches resized and re-exported copies that a byte-for-byte check misses. The full method, including the free command-line options, is in how to deduplicate a messy photo library.
The point of cleanup is not tidiness for its own sake. It is that a smaller, deduplicated, well-indexed library returns better search results, because the right photo is not buried under four slightly different copies of itself.
How different teams find their photos
The core method is the same everywhere, but the vocabulary and the stakes change by who is doing the searching. A few of the most common cases:
- Marketing teams need a repeatable intake-to-share system, not a heroic one-time cleanup. The workflow that holds up over a busy quarter is in photo workflows for marketing teams.
- Wedding and event photographers live or die by pulling the right gallery from a multi-season archive. The end-to-end version is in the wedding photographer client gallery workflow.
- Restaurants and hospitality teams sit on years of food, interior, and event shots that marketing, PR, and delivery partners all pull from. That archive is its own discipline, covered in restaurant photo organization and, for hotels and multi-outlet properties, a hospitality photo library your whole team can search.
- Real estate teams need the right room from the right listing, fast, across hundreds of shoots. The listing-first setup is in real estate photo organization.
- E-commerce and product teams juggle SKUs, variants, and lifestyle shots that all look alike in a filename. The at-scale method is in e-commerce product photo organization.
If your situation is not on that list, the method still applies: connect the storage you already use, read every photo once, and search by content. The industry guide just saves you translating the general method into your specific shot list.
How to choose a tool
Not every team needs to buy anything. Here is the straight decision matrix.
- Browse and folders are enough if your library is small, personal, or rarely searched. Do not pay for a problem you do not have.
- Pick a device-first organizer (Excire, Mylio, Apple Photos) if your photos live on your own computers and you are the main person searching them. Mylio and Excire now sell team editions too, but they sync or share a local catalog rather than searching the cloud storage your team already uses. They are good tools for the local-first case.
- Pick a connected image catalog if your photos already live in Google Drive or Dropbox, you have a team, and people need to find shots by description. This is the case the rest of this guide describes, and Tagrly is one option in this tier, alongside others that connect directly to your cloud.
- Pick an enterprise platform (Brandfolder, Bynder) if you have a procurement department, brand-governance requirements, and a five-figure budget. They do far more than search, and you pay for all of it.
We compare the connected-catalog options head to head against the alternatives in our buyer's-guide comparisons, including how Tagrly stacks up against Lightroom for teams. In short: if the real job is a team finding and sharing finished photos that already live in a shared cloud, that is a search problem, and a connected catalog is the category built for it. If you also need to edit RAW files, keep your editor too; most studios run both.
What to do next
If you take one thing from this guide, it is that finding a photo in a large library is not a folder problem or a discipline problem. It is a search problem, and the only thing that solves it is a layer that has read every photo and knows what each one shows. Filenames will never get you there.
The shortest way to see whether this fits your library is to run it on a real folder of your own photos. Tagrly's free tier indexes the first 500 photos in any Drive or Dropbox folder at no cost, no credit card, so you can type a description and watch the right shot come back. Start free with your own folder, or read the bulk tagging pillar guide for the deeper background on how the indexing pass works. For the accessibility side of what good descriptions look like, the W3C's image guidance is the standard worth reading.
Stop scrolling through thumbnails. The photo is in there. You just need something that can read it.
Frequently asked questions
How do I find a photo when I can't remember the filename?
Stop searching by filename. Camera filenames like IMG_4827.JPG carry no information about what the photo shows, so a filename search can only find a photo you already named by hand. The reliable way to find a photo in a large library is to search by what is in it: the subject, the setting, the lighting, the event. That requires a layer that has read every photo and recorded what it contains. Google Drive and Dropbox do not read your photos this way, which is why their search keeps coming up empty. An AI image catalog reads each photo once, writes down the focal subject and the scene, and then lets you type a plain-English description like 'rooftop sunset with a crowd' and get the right shot back.
Can Google Drive search photos by what's in them?
Mostly no. Google Drive search is built for documents. It matches filenames, folder names, file types, owners, dates, and the text inside documents and PDFs through OCR. It does not look at the actual content of a JPEG, so a search for 'sunset' returns only photos that happen to have the word sunset typed into the filename or a manually added description. For a library where every file is named DSC_0481.jpg, that is almost nothing. Drive added some natural-language search through Gemini, but it still leans on text it can already read, not on the pixels of your photos. To search photos by their visual content you need a tool that has tagged each image first.
How fast can you search a 100,000-photo library?
Once the library has been indexed, search feels instant at any size, because each query runs against a small text index of tags and descriptions instead of re-opening 100,000 image files. The real work is the one-time indexing pass. It runs unattended in the background, and what is already read is searchable while the rest is still going. Photos that have been read are never read or charged again, so adding new photos later only indexes the new ones. From then on, finding any photo is a single search.
What is the best way to organize a large photo library so photos are findable?
Folders alone do not scale. Folders force every photo into one location chosen by one person on one day, and the moment two people would file the same shot differently, the system breaks. The durable approach is to keep your folder structure for storage but add a search layer on top that reads every photo and makes the whole library findable by content. That way you do not have to predict, at upload time, every way you might want to find a photo later. You search for what the photo shows when you need it, and the answer comes back regardless of which folder it landed in.
Do I have to move my photos to a new app to make them searchable?
No, and you should be skeptical of any tool that requires it. The better catalog tools connect directly to the storage you already use, Google Drive or Dropbox, read your photos in place with read-only access, and never move or copy your originals. Your folder structure stays exactly as it is. Tools that require a full migration into their own storage create a slow one-time upload and an ongoing sync problem, and they hold your library hostage if you ever want to leave. A read-only connector that leaves your files where they live is the lower-risk path.
How do I find one specific photo in a shared team library?
The trap in a shared library is that the person who took the photo and the person looking for it are usually not the same person, so no one remembers where it was filed. The fix is a shared search layer everyone on the team uses. When every photo has been tagged by content, anyone can type a description and find the shot without knowing who shot it, when, or which folder it lives in. This is the difference between a shared folder, which is shared storage, and a shared catalog, which is shared findability. A small team gets the most value here because there is no full-time librarian to maintain folders.
Try Tagrly on your own photo library
Connect your Google Drive or Dropbox folder and Tagrly will tag every photo in bulk. Search by what is actually in the image, share specific shots with clients, and never lose a photo again.
- Free for your first 500 photos
- Read-only access, revoke anytime
- No credit card